Complete tutorial rework

It was proposed more than once before that the tutorial has to be reworked. I also think the tutorial needs to be reworked.
The biggest problem with the current tutorial is that it is pretty much outdated.
So I propose a complete rework of the tutorial. I have worked out an outline for it. Here it is:

Principles of the reworked tutorial:

[ul][]The tutorial is like the current tutorial one house.
[
]Howerver, this house is big and organized into several rooms, where (almost) every room covers a topic / a lesson.
[]The tutorial is designed such the student is free to visit every room at will, but the rooms “basic controls” and “item basics” should/must be visited first, since the other lessons depend on them. This tutorial design principle has been copied from The Dark Mod, by the way.
[
]Except for basic controls and item basics, the lessons should be more or less independent from each other.
[]The tutorial building is rather large and requires multiple overmap tiles.
[
]Every topic is treated in a seperate room.
[]Events may still trigger messages, but only once.
[
]There are computer terminals around to reread the messages, also to explain more complex topics which can’t be triggered by events.
[*]Some of the old texts may very well be reused.[/ul]

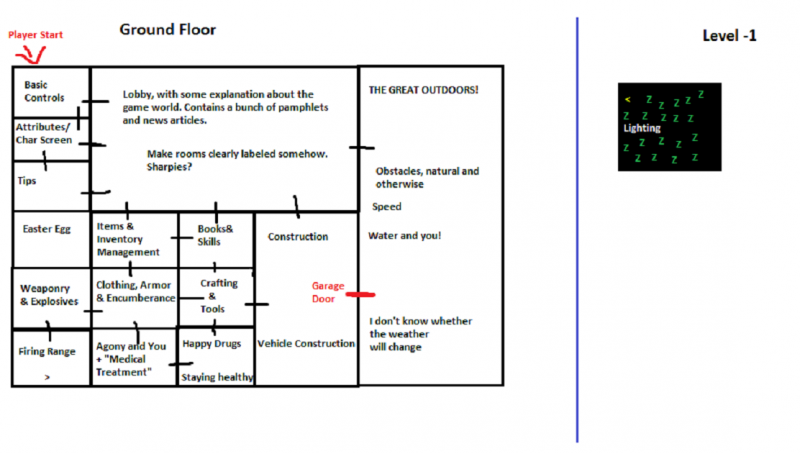
Here is an image of the room structure:


(black indicates walls, black dashed indicates imaginary borders. Short black lines crossing wall lines indicate doors. “<” and “>” are stairs.)

I think the room names should be pretty self-explanationary by themselves. But the devil is in the detail. If you want to know the full outline, read this explanations of the rooms:

[ul][]basic controls: The student starts here. In this room the most important controls are taught there: Movement, pausing, opening and closing doors, examining, looking around, quitting the game. This room has one door which leads to the lobby and one stairway leading to the “lightning and darkness” room. This is the most important room and must be designed with care, since the rest of the tutorial bases on the lesson taught here. It is suggested that the player visits the “item basics” room next.
[
]lobby: This room simply connects most of the other rooms.
[]item basics: Basic item facts are taught here. This includes:: picking up, dropping, examining, inventory, comparing, item list (“V” key), weight, volume. This room contains some example items to play around with. This room also contains shallow water and containers for liquid and teaches how to refill and unload them.
[
]obstacles: Contains more walls, fences, wooden doors, metal doors, windows and furniture. Teaches movement cost, movement speed, the little number to the right bottom of the sidebar, smashing, moving furniture, cleaning up windows.
[]books and skills: Has basic books for learning and books for enjoyment, explains their purpose. Teaches how to increase skills (by books and by training).
[
]tools: Has some basic tools which can be activated. Also explains more item concepts: reloading, unloading, activating, charges. Has at least flashlight and a lighter.
[]clothing and encumbrance: Contains clothing and at least one backpack. Teaches how to wear and take off clothing. Teaches encumbrance from clothing and from carrying too much. Mentions the clothing sorting menu. Briefly mentions and shows one example of special clothing (i.e. waterproof). Most of this can be carried over from the existing tutorial.
[
]construction: This area is outdoors and contains some pre-built furniture and some building materials and tools neccessary to build some example constructions. It is taught how to build stuff in general, and specifically how to deconstruct things.
[]vehicle construction: This outdoor area contains tools and materials to build vehicles. Some vehicle chassis spawn here as well. It is taught how to start a vehicle construction from scratch, how to repair parts and how to take off parts. It is also briefly mentioned which components are neccessar to make a vehicle run.
[
]vehicle usage and grabbing: This outdoor areas has some ready-to-drive vehicles, at least one car and one bike. It is taught how to drive, to toggle light, how to use the speedo meter, how to leave a vehicle and how to refuel a vehicle. This area has some gas pumps.
[]crafting: Has many items. Teaches the student how to craft. Teaches how tools and crafting components are used. Shows: Crafting menu, repeat last crafting. This room also has a fireplace. The student is taught here how to start a fire safely, because fire is an important part in many crafting recipes.
[
]melee weapons: Has some basic bashing and cutting weapons. Teaches wielding. Teaches how to wield nothing again. Teaches how to wield nothing again. Explains the difference between bashing and cutting damage.
[]ranged weapons: Contains throwable items, some basic throwable explosives (eg. grenades), and some basic firearms and at least one bow. Explains ammo, ammo types, reloading and unloading. Briefly mentions that reloading and unloading are not limited to weapons only. It took me quite some time to figure that out. :wink:
[
]shooting gallery: Has some targets to test ranged combat.
[]arena. Some zombies spawn here, to teach combat. Many of existing tutorial texts can be carried over here. The doors are made of steel and the student is warned when entering the arena. The arena may contain some smashable obstacles.
[
]first aid: full of bandages and first aid kits. Mainly there to recover from battles in the arena. Briefly explains how to use them and maybe to cure bleedings and infections.
[]tips: The student is taught there other stuff here which isn’t taught in the other areas. Mainly this will just mention misc. controls: morale, message log, help menu, advanced inventory, …. Other places where to seek further help are mentioned here. No gameplay tips, however! This place is really just for stuff which doesn’t fit anywhere else, mostly theoretical stuff.
[
]lightning and darkness (basement): Basically just to have something where the stairs of the basic controls room lead to. Maybe use the same behaviour as in the original tutorial. A flashlight can be obtained from the tools room. Maybe there is one interesting item lying around here, but that’s about it.
[]swimming: contains a swimming pool and some basic swimming gear. Teaches how weight can influence the ability to swim and why the student may sink like a rock.
[
]traps: How to set traps, how to step in a trap, how to dismantle a trap. Room contains some example traps, placed and unplaced.[/ul]

Note: Nothing of this has been coded. This is a proposal and comments are welcome.

Well… Maybe it should be outside a bit too.

I’d definitely vote up any sort of tutorial rework. The current one is kinda out of date and really needs some TLC time.

A good start but I feel the map needs a few adjustments. Mostly I wanted to rework the map so it flows from left-to-right, top-to-bottom, and for things to flow logically for the mechanics of cataclysm. The player should be allowed to explore around the entire outside of the building.

Feel free to comment things or suggest changes. I’m just putting some work in to put together a functional tutorial.

Modified Map

Basic Controls

[spoiler]
{Player spawns}
Use the numpad to move around. Make sure numlock is set correctly. > is down and < is up, and the staircases are represented by the same symbol. The escape key will enable you to leave this menu and many others. ; will enable your character to look around at nearby items. Try it now!

{Player Highlights object}
g or , will allow your character to (g)et items. Capital V will allow (V)iewing nearby items or monsters. i will open the (i)nventory menu.

{Player moves in front of a dresser}
Press e and then select a direction to (e)xamine.

{Player Examines Dresser}
(e)xamining a pile of items on the floor allows selectively picking up groups of item adjacent to you, as well. It is also possible to directly (d)rop items from your inventory.

{Player approaches door}
Try leaving the room by (o)pening one of the doors.

{Player exits first room}
The (m)ap is very helpful if you ever get lost.[/spoiler]

[b]Attributes[b]

{Player enters Attributes room}
Hitting @ will open the attributes screen. A plethora of information is shown, most of which will be covered later. You can move between the various lists with tab and explore details with the arrow or numpad keys.

{Player opens Attribute Menu}
You can explore details of the attribute menu with the tab key and the arrow or numpad keys. Traits include starting traits and mutations. Effect include things like illness, weather, and being hurt. (v) will open the morale screen, which tells you what is negatively or positively affecting your character’s morale.[/spoiler]

Tips

[spoiler]Never get upset or panic. Time only passes when you press a button. Checking the inventory, looking at monsters, and the character screen takes no time.

You can always have your survivor retreat and come back later. Zombies are quite slow. Never get cornered!

The game acts very much like a simulation. If it works in real life, it may work here.

Plan ahead.

Time itself is accelerated. Learning, recovering from wounds, and the seasons take less time. So do deadly diseases. Be careful.[/spoiler]

Inventory Management

[spoiler]As a reminder, you can open the (i)nventory. You can also open advanced inventory management with the " / " or slash button.

{Player opens inventory}
In the (i)nventory is a list of items by either selecting them with the arrow key and hitting enter or entering the associated letter in front of the object. This will bring up a secondary menu which allows direct object manipulation.

{Player closes inventory}
The list shown when examining an individual item within the (i)nventory mostly has commands which can be used directly from the main screen. (a)pply and = for reassign associated letter are both examples. Advanced inventory management can be opened with the / (or slash) key.

{Player opens Management}
This opens two lists that you can swap between. The lists themselves can be altered to be various locations ranging from your inventory to any of the adjacent squares-including directly below you! Be warned, however, moving items does consume a great deal of in-game time. The management system is for your convenience.

{Player closes Management}
Remember, inventory management is opened with /. The normal (i)nventory is opened with “i”

Clothing, Armor, and Encumbrance

[spoiler]{Player enters room}
A survivor won’t get very far in the apocalypse completely naked! Try picking up the backpack over there.
[Assorted clothing fitted and non-fitted including armor is on the floor here]

{Player picks up backpack}
As you can see, because you did not have enough storage space your character automatically grabbed it in their hands. A backpack still makes a poor weapon. Try (W)earing it instead.

{Player wears backpack}
Checking (i)nventory reveals the volume went up. This means more items can be carried without penalties. However, hitting @ reveals encumbrance went up as well, which directly affects your character’s ability to carry out actions. Items with the (fitted) tag are exactly the right size for your character and result in less encumbrance. Try sorting through those clothes and wearing them.

{Player wears not-backpack}
Encumbrance may have gone up, or your character may now be uncomfortably warm. Enter + into the prompt to open layering.

{Layering Open}
Layering is mostly self-explanatory. Which items are on top, which are on the bottom, how much protection and what are their various stats? You can switch between hit locations and take time to look at the items along for rearranging them for ideal protection. Generally you want the most durable armored pieces on the outside with your very useful and cargo-carrying pieces to be on inner layers. For maximum style, make sure your top hat is ALWAYS on the outer layer.

{Layering Closed}

  • will reopen this menu. Prioritize needs. Primary is ensuring your character’s body stays at a comfortable temperature. Too warm or too cold can lead to disastrous results or sickness. A short while of either is completely harmless. Encumbrance follows closely after. Try to balance it against your skills and stats. They may be sufficiently high and the gear good enough that you can absorb a few penalties. After that is armor (nobody wants to die) and storage. Clothing can be (T)aken off or (d)ropped directly.[/spoiler]

Weaponry&Explosive

[spoiler]
[Room has variety of guns and melee weapons. Box in corner contains a stick of dynamite and a lighter.]
{Enter room}
Ah, the fine part of surviving the cataclysm. Killing everything that moves. You do not have to use a gun, as your fists can be used in a pinch. As you are not a martial artist I would advise against that. Increased hit (accuracy) and damage is good. Weight should always be considered a factor. Volume is not unless you are carrying several types and switching between the two. Try grabbing a few weapons and examining them in your inventory.

{On Melee Wep pickup}
Melee weapons are short range and simple. Some of them can block. They are also much quieter than guns and therefore attract less attention. Sometimes they count as one-handed if your strength is sufficiently high.

{On Bow pickup}
Relatively rare findable ammo and rely partly on strength. Ammo can be reused. Very slow firing time. Ammo is easy to craft and they are quiet.

{Gun pickup}
The strongest weapon in the game (that you know of): Guns. Ammunition is more abundant in cities but harder to acquire and pulling the trigger on one of these badboys is likely to attract a lot of unwanted attention. They can also get some very nice upgrades or attachments.

{On Dynamite pickup}
Try (a)pplying the dynamite. Remember, you need the lighter, but some explosives have igniters built in.

{Lit Dynamite}
Uh-oh. Try (t)hrowing it somewhere and fleeing before it goes off inside your character’s pocket. Most objects can be (t)hrown for a varying amount of damage, even if they are not bombs. Strength affects the distance it can be (t)hrown away from your character.

{Thrown Dynamite ; Ensure player skill in throwing is set to 1}
Your character’s skill in (t)hrowing affects how accurately they can land the item. Improved (t)hrowing skill gives greater range, damage and accuracy.[/spoiler]

Firing range

[spoiler]
[Contains nonhostile immobile dummies and ammunition, along with a console to respawn them.]
Your character’s skill with a weapon affects your accuracy and critical chance with a weapon, along with chances of bypassing armor. Increased damage and to-hit are good. Higher dispersion, recoil, and reload time is bad. Some weapons can be fired in either semi-auto, burst, or full auto. Enter (F)iring mode to change shooting intent.

{On ammo pickup}
You can examine weaponry to see what kind of ammo, if any, that it uses. It can be {r}eloaded, although some weapons automatically fire and reload in the same round.

{On dummy kill}
You managed to kill something! Go loot the corpse by (e)xamining it or standing over it and (g)rabbing things. You can also (s)mash corpses if they happen to be the sort to come back to life or (b)utcher them if you have a sharp implement. (b)utchering tends to take longer but nets you resources.

{On smashing dummy}
It will not be getting up after this. The body can still be (b)utchered, and things other than corpses can be (s)mashed such as bushes, furniture, and windows.

{On stairs}
You can go down with >[/spoiler]

Lighting

[spoiler]It is rather dark. Many creatures are limited in their ability to see at night. They can still hear or smell your character, and actions create sound depending on what they are (including walking). Pick up the flashlight and shine it around.

{Flashlight pickup}
All of the question marks are sources of sound. I wonder what they are? Try (a)pplying the flashlight.

{Flashlight on}
Oh. Maybe that wasn’t such a good idea.

{On Exit}
The flashlight will steadily drain batteries, but can be ®eloaded with them like a gun can. (a)pply the flashlight again to go green and conserve energy.[/spoiler]

Medical (Should have a connector between it and Firing Range)

[spoiler]
[Room contains surgery table, bandages, and a soldering iron.]
Receiving injuries is a danger to all character. Fortunately, only a complete loss of head health or torso health results in death. Losing limbs is still bad since this makes them nonfunctional and crippled, restricting mobility and weaponry use.

{Upon table examination}
Due to budget cuts we have only been able to outfit this room with bandages and a cauterizing implement. Knives and a heat source can be used as well. (a)pply any.

{On receiving damage, regardless of location ; Several steps into this room should automatically inflict player with arm damage and an infection if you do not already have them.}
Looks like you have an infection. Allowing it to run rampant can quickly become deadly in a few days. Go clean it up with tools in the medical room.

{On cauterization}
Not exactly painless, but it is better than dying. If the infection proceeds consumption of difficult-to-find antibiotics or other troublesome methods may have to be gone through. Ideally before death.[/spoiler]

Happy Time!

[spoiler]It is more difficult for your character to do things in pain. After “curing” the source of the pain, you can either have your character wait for it to go away or take addictive drugs. Or just for fun, they have numerous benefits.

{On taking drugs}
Congratulations, you just affected your character’s long-term health. But they feel better now. Remember to take vitamins twice a day or flu shots once every couple of days, or more if you’ve been abusing drugs. Health is not the same thing as HP. If your character is getting colds they probably have negative health; consume more health-increasing items.[/spoiler]

Crafting and Tools

Cataclysm: Dark Days Ahead has a crafting menu openable with the & symbol on the keyboard. In it is a series of lists of recipes you currently know how to make, along with their component materials and results. Sometimes they require specialized tools in your inventory or adjacent to your character. Items, when examined within your inventory, will always show what kind of tool they are. Your character’s skill in the associated difficulty determines your chance of success. Fabrication also influences how quickly they can craft, along with the installation of CBMs.

Books and Skills

Reading an associated book will raise your character’s skill. They frequently have minimum levels for reading and maximum levels for training. Many books also have crafting recipes contained within. Be warned, reading books consume valuable time, and the proficiency of skills that are not used on a regular basis will go down over time. The higher the skill, the more rapidly it decays. Simply using or training that skill can put a temporary halt to this. This effect is called Skill Rust.

Construction

[spoiler][Tools litter the ground, a golfcart missing some pieces, missing pieces scattered on the floor. There is a lone shopping cart.]
There are two types of construction. Constructing objects varying from furniture to vehicles, and altering the terrain. Press * (shift-8) to open the construction menu.

{On menu open}
Construction is similar to crafting. Certain tools are necessary, higher-level tools make the work go faster, and materials may be consumed in the process. Unlike crafting construction is procedure. You half build something, stop, open the construction menu again, and choose to complete or change it. For example after digging a pit you can choose to either fill the pit spikes or refill the pit with dirt.

{On approach of shopping cart}
Useful devices which can be (g)rabbed. They can then be dragged or pushed around or have items (D)ropped into them, saving valuable inventory space. It takes longer to grab or use an item inside the cart then from your inventory.

{On grab of cart}
You can make your character let go by entering g again. Carts are easily snared on terrain. The condition of the cart can be determined through (e)xamination.

{On approach of half-functioning vehicle}
Vehicle construction is slightly more involved. The minimum prerequisites are a welder, welding goggles, and a wrench when installing parts. Chopping things off merely requires a hacksaw and a wrench. Removing things is easy and trains mechanics. Installation of objects can fail with sufficient penalties.

{Player (e)xamines vehicle}
Navigation of this menu is done with the arrow and enter keys. A quick examination shows the cart is missing a few pieces. Perhaps you can change that? Remember: Constructing a new vehicle is different than repairing or altering an already-existing one.

{Player completes vehicle}
Good! Now go give it a spin. Remember to open the garage door first. The vehicle can be driven with ^ (shift-6).

{Player approaches any console or level}
Levers and consoles can be used by (e)xamining them, as can many other immobile devices. Hacking computers requires level in computers skill and failing can result in being electrocuted, setting off alarms, or accidentally destroying the entire network the machine is logged onto.

{Player takes control of vehicles}
Driving is influenced by your driving skill. The faster, the harder it is to control. The numpad corresponds to various actions. 7, 8, and 9 are all accelerate (forward left, forward, forward right). 5 is cruise control. 4 is turn left, 5 is turn right. As you can imagine 1, 2, and 3 are exactly like their acceleration counterparts except for slowing down or reversing.[/spoiler]

The Great Outdoors

[spoiler][Area has a tarp ceiling and wooden bars on all sides except south side; south side has trees dispersed forcing player out of vehicle]
[Garage door exit has a land mine right outside, with various things-metal wreckage, counters, broken furniture, bushes, and a busted-up fridge. Player notedly does not have enough perception]
{On running over land mine}
What sort of sick person would do this? The survivors of the apocalypse, for whatever reason, love to put traps everywhere. With a high enough perception your character will notice them, and they can be disarmed or placed upon the floor somewhere more useful from your inventory with (a)pply. A particularly clever survivor may realize traps are around based on context clues.

{On entry to area not inside vehicle; exiting vehicle inside area.}
Speed is an important factor. Every action taken consumes in-game time. Pain and other details can decrease speed. Obstacles you can move through use more movement. Drugs can increase speed. Zombies are actually slightly slower than 100 units of speed, but it varies. The more speed, the better. The minimum speed your character can have is 25, which means zombies will be taking anywhere from three to four actions (or more) for each one you take. This usually spells death.

[Swimming pool on north side of area]
{On approach of pool}
Swimming can be quite dangerous. Drowning is an ever-present danger (unless you have gills) and the heavier the gear you’re wearing is the more difficult. It can be a good way to escape monsters who cannot swim or simply cool down in unpleasant heat.

{Upon exit of covered area}
The weather can change, sometimes dramatically. It is split into the four seasons of spring, summer, autumn, and winter. Spring and autumn tend to be quite comfortable, although the latter tends to be colder and rain more often. Winter can be deadly as food becomes more scarce and the temperature drops radically.
This is the end of the basic tutorial. Consult the helpfiles for more advice or finish exploring inside the building. Good luck, survivor![/spoiler]

Now all I need is someone to act as an editor and then a coder to implement it. Any volunteers?

Comments:

First, thanks for putting additional thought-work into this.
I like some of your ideas but some other ideas I don’t like.
Here I give my random and unordered thoughts on your thoughts:

I do not like your proposed room design. It is rather chaotic and also breaks with the principle of the lobby connecting most rooms. I also want to have signs or something like that to show the topic of the room. Like “You see here a sign which says ‘Tools room’.”.
Also you propose too many deadly surprises for my taste. The basement should not be full of zombies and the land mines should be removed. Remember, this is a tutorial, not the real game. The tutorial is allowed to have dangers, but only in controlled areas and if the student is warned.
The idea of sounds is good and clearly has to go into the tutorial. Sounds can also be made by harmless creatures, no need for a death trap here. :wink:
Good idea for adding a drugs room.

Many of your proposed strings are okay to me. But I think too much text may be a bit too overwhelming. There is a lot of theory in them, too. Maybe a bit too much. The texts are good, but some of them should go to the help instead, I think. The tutorial can aim for the practical stuff, like how to do stuff. The help can attempt to explain everything, but also the theory, like the concept of focus.

The basic controls lesson is poor. This lesson is very important and needs careful planning. A player who is new to roguelikes is likely not to understand what the hell is going on and what all those strange symbols mean, for example. I would certainly mention the non-keypad keys for movement. Not all keyboards have a numpad.

Most of your string could probably go into the help files instead? I think the tutorial should not replace the help entirely, as a C:DDA player also needs to grasp the theory. I don’t think a tutorial is suited to explain concepts like focus.
Besides, many of the strings you wrote are actually not needed. Some strings of the current tutorial can certainly be reused.

This is the end of the basic tutorial. Consult the helpfiles for more advice or finish exploring inside the building. Good luck, survivor!
Such a message should appear only if all lessons have been taught, therefore not neccessarily in the outdoor area. I would repeat here how the tutorial can be (optionally) be closed.

I don’t think it’s a good idea to place dynamite indoors. The tutorial definitely needs explosives, but only weak ones. Dynamite is pretty strong and likely to mess up tutorial rooms. If it’s about the easter egg, the dynamite is better hidden somewhere without any comment

I had the idea with targets for the shooting range as well. Technically this could be done (I guess) by a new “monster” type (made especially for the tutorial) which does never attack or move and has low health. Maybe more such harmless

[hr]

Slightly off topic: Have you looked on Cataclysm 2? There has been a new help system implemented to it and I think C:DDA can use a lot of its ideas. Ideally, pretty much everything you need to know to play the game should be explained in the game itself. The player should not need to rely on 3rd party sources like the wiki. But that’s a different beast.

[hr]
Edit: Are there any areas left where you think it should be covered in the tutorial? Say it, please! If you know a topic where you had to look into the wiki first to find out, that’s a good candidate.

I fully support this.

The rooms can be loaded from json like any other map (including items and monsters). Multiple map squares are no problem either (but require some addition code and unique names like “tutorial_1”…).

The current tutorial shows messages only once (per game, starting a new tutorial gives the same messages again). The situations when they appear (like “player is near door”) is fixed. The specific situations when they should appear in the new tutorial must be outlined before they can be added.

Adding text entries to computers is “relatively” easy, it seems. Something like the computer you find in the shelter.

Help system of Cataclysm 2: do you refer to the item/monster browser? This can be implemented like the debug menu, but of course without option to spawn them. It shows the whole description of the item/monster. But there is no hiding of not yet encountered items/monsters. The other parts of the help system seem to be similar to the ones we already have. Or am I wrong?

There is a flag for immobile monsters (used on the generator and the turrets).

The design is intended to force players to be introduced to specific commands before gaining new ones, particularly if they are related. It is not chaotic. It can be replaced by adding more scripted triggers. They will have to be written.

Also you propose too many deadly surprises for my taste. The basement should not be full of zombies and the land mines should be removed. Remember, this is a tutorial, not the real game. The tutorial is allowed to have dangers, but only in controlled areas and if the student is warned.
That is exactly why I have these dangers. That how the game itself is. Zeds aren't exactly deadly if you just picked up a few guns. Also you are standing on the stairs so you can just flee from them. The whole idea is to slide the player into thinking a certain way about the cataclysm. That is a valid point about the land mine. Perhaps a trap that still damages vehicles sufficiently, but is not terminally dangerous. Like a shotgun trap instead.
There is a lot of theory in them, too. Maybe a bit too much. The texts are good, but some of them should go to the help instead, I think. The tutorial can aim for the practical stuff, like [i]how[/i] to do stuff. The help can attempt to explain everything, but also the theory, like the concept of focus.
Please specify which sections you are having problems with that do not focus on the practical. I can add something about focus.
I don’t think a tutorial is suited to explain concepts like focus.
I never wrote a single line about focus.
The basic controls lesson is poor. This lesson is very important and needs careful planning. A player who is new to roguelikes is likely not to understand what the hell is going on and what all those strange symbols mean, for example. I would certainly mention the non-keypad keys for movement. Not all keyboards have a numpad.
That's very true. Time to be lazy!
Besides, many of the strings you wrote are actually not needed. Some strings of the current tutorial can certainly be reused.
Replace the tutorial I wrote for basic controls with the one already in the existing tutorial.
Such a message should appear only if all lessons have been taught, therefore not neccessarily in the outdoor area. I would repeat here how the tutorial can be (optionally) be closed.
The message is not for all lessons (and secrets) being taught. You get something else then.
I don’t think it’s a good idea to place dynamite indoors. The tutorial definitely needs explosives, but only weak ones. Dynamite is pretty strong and likely to mess up tutorial rooms.
Another intended object lesson. None of the weaker explosives can mess up buildings, except moltov cocktails... which fill rooms with smoke and set them on fire. I am certainly not going to give a new player a mininuke, either. I definitely need to add "not to scale" to the map.

Couple notes:

It’s not clear that the trainee will have a linear progression, gear to guns to basement, for example. Therefore I’m a bit leery of presuming that the trainee will be able to clear a zed-infested basement. (Unless we’re issuing skills in a “Trainee” profession, too, 0 gun skills may lead to unpleasant surprises.)

Flu shots are an order of magnitude more powerful than vitamins: take one and you’re set for the season, assuming that you don’t do something like try to breach a Threshold or something. Taking one every few days wastes them, unless you’re a terminal heroin/mutagen cocktail addict or something.

Dynamite IS quite capable of destroying walls/rooms. A grenade might be safer for the generic “explosives lesson”. Likewise the land mine might be overkill: a few buried bear traps ought to take out the cart’s tires (immobilizing it, and prompting the player to go grab spares and fix!) without endangering the player.

(I see you’ve got a Secret Room there. If you tell the player about powerful explosives demolishing walls, and leave dynamite lying around, that’s another story. Obviously, I’d then put the mutagen and bionics lesson in the Secret Room. maybe the radiation lesson too. :wink: )

The zeds from the lighting-basement will in all likelihood follow the player back upstairs; they shouldn’t make noise unless the player alerts 'em, though, so telling the player to watch for question marks might/not work. Suggest telling the player to go armed, and maybe make it one or two zeds?

Basically, the player needs to trust the tutorial. It’s there so you can get a handle on the game mechanics without getting killed, not so you can get killed in the tutorial* as a testament to DDA’s Totally Roguelike Difficulty!!1!

*I know Desktop Dungeons killed you–repeatedly–in the tutorial, but it said it was going to kill you, and that it did so to move from one lesson to the next. Not “oops, you followed directions and got yourself into a potentially lethal situation, next time don’t trust the tutorial”.

Although I think the Tutorial should definitely kill you as it’s “final” lesson - that’s how you know you’re done, and it teaches you the most important lesson of all! (Expect to die)

Starting the character with some skills would be fine, I think.

A lot of valid points about changes, so now my question becomes “Should the tutorial be made linear?” Why or why not?

My opinion is that it should be because a lot of details lead into each other. Maybe a little bit of flexibility in the form of context sensitive triggers and sets of room paths, but basically sequential.

[quote=“Nappist, post:12, topic:5928”]A lot of valid points about changes, so now my question becomes “Should the tutorial be made linear?” Why or why not?

My opinion is that it should be because a lot of details lead into each other. Maybe a little bit of flexibility in the form of context sensitive triggers and sets of room paths, but basically sequential.[/quote]

Directly linear might be overkill, yeah.

Putting a warning-note on the basement (graffiti in front of the door? “I hope they don’t come back up…”) ought to suffice to let people know that it’s not safe, and they ought to prepare first. Your original design lets people explore and avoid things they’ve already covered, which are both good qualities in a training situation.

[quote=“GlyphGryph, post:11, topic:5928”]Although I think the Tutorial should definitely kill you as it’s “final” lesson - that’s how you know you’re done, and it teaches you the most important lesson of all! (Expect to die)

Starting the character with some skills would be fine, I think.[/quote]

That’s not a bad idea.

The graffiti leading to the basement should OBVIOUSLY say “DON’T DEAD OPEN INSIDE”

Perhaps when all the computers have been read, the basement door is broken down and endless zombies are spawned. You can hold out for a while if you know what you’re doing, but eventually you will be overwhelmed.

[list]About linearity:

I think we could do a mixed model. The very basic stuff should be linear, but after that has. The basic stuff are basic controls (movement, examination, look around) and basic item usage (picking up, dropping, activating). If you got that, you can do the other stuff in pretty much any order. Surprisingly many concepts of the game do only need this basic stuff. You don’t need to know how to combat in order to drive a vehicle, and vice-versa.

The suggested order is thus:

[ul][]Basic controls: Movement, examination, looking around, opening and closing doors.
[
]Item basics: picking up, dropping, a bit theory (weight, volume)
[]Containers, tools, unloading
[
]Everything else in any order[/ul]

(this may require a reorganization of the room plan, again!)
I don’t think any of the advanced lessons really depend on something from another advanced lesson. Of course some may still be intertwined, but not really dependant. One example: You don’t need to know combat in order to build vehicles. You do have to know a little bit construction to build vehicles. Now for this case the tutorial could just briefly say “To start a vehicle construction you need X, then press Y and Z to start it.”. This does not really explain construction, so it could be added “Walk to the construction area to learn more about contruction.”. The student can still finish the vehicle construction lesson without really to know about construction, or the student can choose to walk to the construction section instead. This is an example where two topics are intertwined.

Also the points 1-3 should not be forced upon the student, the student can simply walk through the rooms instead. But on entering another basic room, the player is informed what this room is about and that the rest of the lessons depend on this, too. After leaving room 3, the student is told that he/she/it’s in the lobby now and can do the remaining lessons in any order.

I also want to have the tutorial re-usable. The game is complex and maybe the player can use the tutorial to try out something, without cheating. Like, “oh, I forgot how to build vehicles”. In that case, it would be really annoying to be forced to do half the tutorial again just to try out one thing.

I like the idea of overwhelming the trainee with never-ending zombies at the end. !!!FUN!!! But only at the end. And maybe not from the basement, more like from all directions.

[hr]
Reply time!

To Nappist:

I don’t think a tutorial is suited to explain concepts like focus.
I never wrote a single line about focus.
This was just an example. I meant that concepts that [i]are so complex like[/i] focus should go into the help instead. You did not mention focus, right, but this does not matter here. As I said, the tutorial is intended to learn how to [i]do[/i] things.
That is exactly why I have these dangers.
Sorry, I don’t accept that. It is unfair to kill the player [i]before he/she/it had even understood the game[/i]. The regular game can be as unforgiving as it should be, but the tutorial is not the real game. It is really annoying to get killed and not even understanding why or how to attack back [i]at all[/i]. Keep in mind the student may even be new to the genre of rogue-likes. Unless, the student finished the tutorial or he/she/it [i]chose[/i] to take the risk. Also, the tutorial should not lead the student into any strategy or “thinking”, it would be more pleasing to figure out strategies in the real game by oneselves.
Please specify which sections you are having problems with that do not focus on the practical. I can add something about focus.
Hmm, that was more like a general remark. The texts are not [i]too[/i] theoretical and its not that bad, actually. But maybe I’ll write some tutorial texts in the future, who knows? :)

To everyone in this thread except me:
Thank you for taking part in this discussion. It really helps the idea becoming reality and, more important, to get to know what is actually needed. :wink:
By the way, if you plan to actually do some actual work for the tutorial, please tell us in advance, so that two people do not accidentally work on the same thing twice.

For me: I think after all this discussion I have to update my first draft. Then maybe I write (or draw) in a future post about how I think the interior design of the rooms should be, in more detail. Or I try to write some actual tutorial texts. I don’t know for sure yet. Don’t worry, I’ll tell you when I’ve actually started.

Here’s a roadmap on how I imagine this to go:

[ul][]Scope of tutorial (what topics need to be covered) (I think we mostly agree on that now and it can be considered finished)
[
]House design; the lessons (we have an idea of it, but it is still a bit in flux, I need to update my draft, too)
[]Interior room design draft
[
]Put the room draft into JSON files
[]Writing the actual tutorial texts for each lesson
[
]Tutorial events draft (which cause some of the tutorial texts to appear or something to happen)
[]Implementing the tutorial events
[
]Updating more tutorial-related code (I have no clue what need possibly to be done here)
[*]Test and cleanup[/ul]

Hi all,
Sorry for bringing this dead thread to the front as well. I really think that the tutorial could do with lot of re-work. One way would be to give our hero/ine some xp during the tutorial. The more times s/he shows doing things correctly, the more better s/he is. Give him suggestions when s/he is trying to do something and not able to do because s/he forgot the keyboard combo which lets him/her do it. This is specifically true of newbies like me who are used to simple keyboard combos and things like that.

[quote=“shirishag75, post:18, topic:5928”]Hi all,
Sorry for bringing this dead thread to the front as well. I really think that the tutorial could do with lot of re-work. One way would be to give our hero/ine some xp during the tutorial. The more times s/he shows doing things correctly, the more better s/he is. Give him suggestions when s/he is trying to do something and not able to do because s/he forgot the keyboard combo which lets him/her do it. This is specifically true of newbies like me who are used to simple keyboard combos and things like that.[/quote]

If you’re sorry, then don’t bleedin’ do it.